Help
  • Explore Community
  • Get Started
  • Ask the Community
  • How-To & Best Practices
  • Contact Support
Notifications
Login / Register
Community
Community
Notifications
close
  • Forums
  • Knowledge Center
  • Events & Webinars
  • Ideas
  • Blogs
Help
Help
  • Explore Community
  • Get Started
  • Ask the Community
  • How-To & Best Practices
  • Contact Support
Login / Register
Sustainability
Sustainability

Join our "Ask Me About" community webinar on May 20th at 9 AM CET and 5 PM CET to explore cybersecurity and monitoring for Data Center and edge IT. Learn about market trends, cutting-edge technologies, and best practices from industry experts.
Register and secure your Critical IT infrastructure

Changing the BACnet device instance of the SE7000 series room controllers.

Building Automation Knowledge Base

Schneider Electric Building Automation Knowledge Base is a self-service resource to answer all your questions about EcoStruxure Building suite, Andover Continuum, Satchwell, TAC…

cancel
Turn on suggestions
Auto-suggest helps you quickly narrow down your search results by suggesting possible matches as you type.
Showing results for 
Show  only  | Search instead for 
Did you mean: 
  • Home
  • Schneider Electric Community
  • Knowledge Center
  • Building Automation Knowledge Base
  • Changing the BACnet device instance of the SE7000 series room controllers.
Options
  • Bookmark
  • Subscribe
  • Email to a Friend
  • Printer Friendly Page
  • Report Inappropriate Content
Invite a Co-worker
Send a co-worker an invite to the portal.Just enter their email address and we'll connect them to register. After joining, they will belong to the same company.
You have entered an invalid email address. Please re-enter the email address.
This co-worker has already been invited to the Exchange portal. Please invite another co-worker.
Please enter email address
Send Invite Cancel
Invitation Sent
Your invitation was sent.Thanks for sharing Exchange with your co-worker.
Send New Invite Close

Related Forums

  • Intelligent Devices Forum

Previous Next
Contributors
  • Ramaaly
    Ramaaly
  • BillNeville
    BillNeville
  • DavidFisher
    DavidFisher
  • CraigEl
    CraigEl
  • JohnBoehmer
    JohnBoehmer
  • Product_Support
    Product_Support

Invite a Colleague

Found this content useful? Share it with a Colleague!

Invite a Colleague Invite
Back to Building Automation Knowledge Base
Options
  • Bookmark
  • Subscribe
  • Email to a Friend
  • Printer Friendly Page
  • Report Inappropriate Content
0 Likes
4235 Views

Link copied. Please paste this link to share this article on your social media post.

Trying to translate this page to your language?
Select your language from the translate dropdown in the upper right. arrow
Translate to: English
  • (Français) French
  • (Deutsche) German
  • (Italiano) Italian
  • (Português) Portuguese
  • (Русский) Russian
  • (Español) Spanish

Changing the BACnet device instance of the SE7000 series room controllers.

Picard Product_Support
‎2018-09-11 06:13 AM

Last Updated: Lt. Commander Ramaaly Lt. Commander ‎2022-04-05 06:48 AM

Issue

The Device ID and name in a BACnet SE7000 room controller is factory set to the model number plus the MAC address. By default the MAC is set to 254 in the room controller, meaning the device does not communicate since valid MAC addresses need to be in the range 0-127.

In cases where multiple BACnet networks containing SE7000 BACnet room controllers are connected to the same BACnet internetwork there could be duplicate ID's when using this schema.

In these instances a T7600 Device Configurator Tool can be used to change these fields.

Product Line

EcoStruxure Building Operation, EcoStruxure Building Expert

Environment

• Building Operation Workstation
• Building Operation Automation Server
• SSL SE7000

Cause

The Device ID and name in a BACnet SE7000 room controller is factory set to the model number plus the MAC address. By default the MAC is set to 254 in the room controller, meaning the device does not communicate since valid MAC addresses need to be in the range 0-127.

For example when a VT7200F5000B room controller with a MAC address of 41 is connected to a network, its default Device Name will be VT7200F5x00B-41 and its default Device ID will be 72041.

The device ID and name will change as soon as the MAC address is changed at the controller. The MAC address is set in the Installer configuration parameter menu using the Com Addr parameter.

These fields can also be set by any BACnet management tool that can access these properties.

Resolution

The goal of this document is to give simple instructions on how to change the Device Instance of the VT7000 series thermostats using the T7600 Device Configurator tool and the recommended connections and wiring.

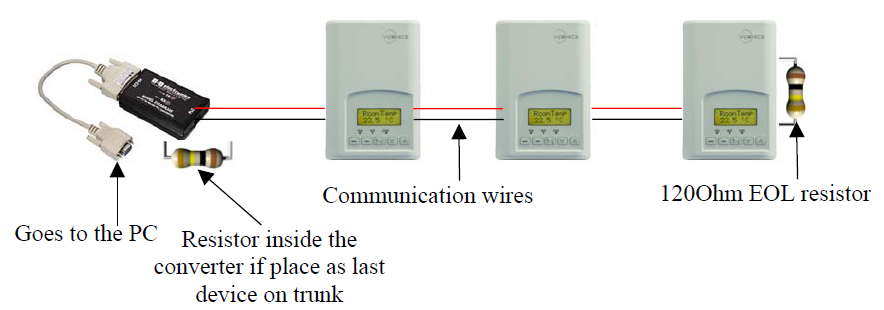
1. Converter (can be other models): Model 485OT9Lor USOTL4 from B&B Electronics. A USB-to-RS485 converter, like one used for MSTP captures, will work as well. 

2. Recommended wiring for the configuration of Device Instances:

The SE7000 room controllers have to be connected only to the converter (which has to be powered up) and disconnected from the network controller. The EOL resistors should remain at both ends of the trunk.

3. Setting up the software

The software is supplied as a simple installer file download the software from here and run the installer.

Prior to running the program for the first time setup steps 4 and 5 must to be accomplished.

4. Setting Windows Compatibility mode

The T7600 Device Configurator Tool is legacy tool and therefore is only supported in a Windows 9X operating system, It has been tested and found to work in later versions of Windows by setting the compatibility mode to Windows 95

Locate the executable file T7600_MSTP_Config.exe in the C:\Program Files\Fastek\T7600 Config\ folder.

Right click the file and select properties

Go to the compatibility tab and change select Run this program in compatibility mode for: "Windows 95" from the drop down menu then click OK

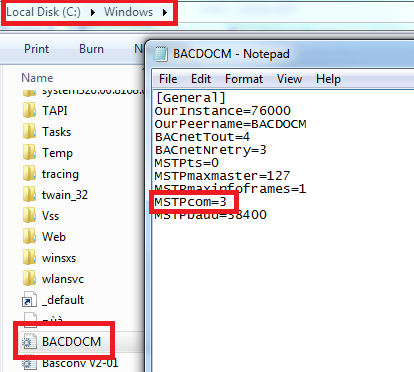
5. Set the PC communications port

Open the BACDOCM.ini located in the C:\Windows folder and enter communications port number in the line highlighted below and save the file. If a valid com port is not entered here the program will generate errors when launched and will not operate.

Instructions on how to use the converter (file T7x00 MSTP Config.exe):


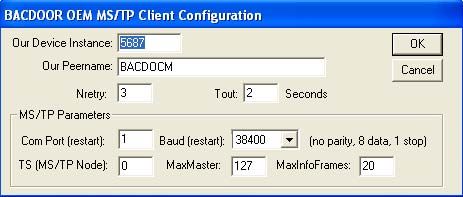
1. Open the configuration Tool
2. Double click on the BACDOOR icon in the icon tray on the bottom right of the PC.

3. On the window BACDOOR OEM MSTP Client status, click configure and in the configuration window set the Device instance to any number that does not conflict with any other device instance on the network.:

4. Close the BACDOOR configuration window and in the T7000 Device Configurator, click refresh device list.
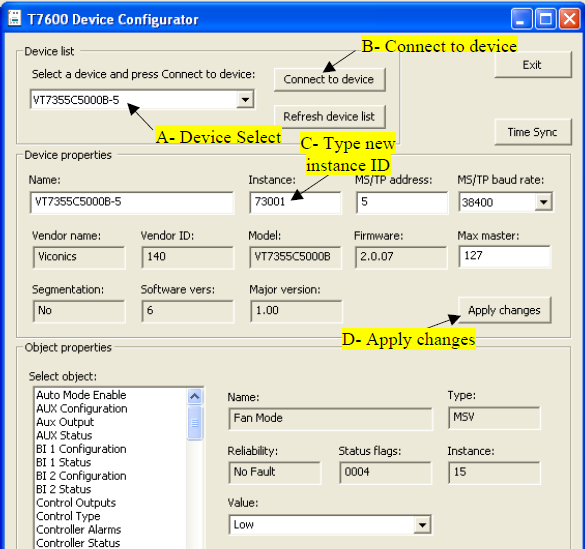
6. All the devices on the trunk should appear and you can start changing the device instances one after the other. To do that:

a. A- Select the first device.
    B- Click Connect to device. The connection process can be long, wait for all the objects to be discovered.
    C- change the instance ID using the keyboard.
    D- click Apply changes.

b. Select the next device and do the same.
c. Repeat this action for all the discovered devices.

7. After making all the recommended changes, remove the RS-485 to 232 converter and reconnect the network.

Labels (2)
Labels:
  • EcoStruxure Building Expert
  • Field Devices
Attachments
setup.zip
Tags (5)
  • Find more articles tagged with:
  • 14525
  • billneville20
  • RamaAly22
  • se7600
  • T7600 Device Configurator
Was this article helpful? Yes No
No ratings

Link copied. Please paste this link to share this article on your social media post.

To The Top!

Forums

  • APC UPS Data Center Backup Solutions
  • EcoStruxure IT
  • EcoStruxure Geo SCADA Expert
  • Metering & Power Quality
  • Schneider Electric Wiser

Knowledge Center

Events & webinars

Ideas

Blogs

Get Started

  • Ask the Community
  • Community Guidelines
  • Community User Guide
  • How-To & Best Practice
  • Experts Leaderboard
  • Contact Support
Brand-Logo
Subscribing is a smart move!
You can subscribe to this board after you log in or create your free account.
Forum-Icon

Create your free account or log in to subscribe to the board - and gain access to more than 10,000+ support articles along with insights from experts and peers.

Register today for FREE

Register Now

Already have an account? Login

Terms & Conditions Privacy Notice Change your Cookie Settings © 2025 Schneider Electric

This is a heading

With achievable small steps, users progress and continually feel satisfaction in task accomplishment.

Usetiful Onboarding Checklist remembers the progress of every user, allowing them to take bite-sized journeys and continue where they left.

of