
Issue
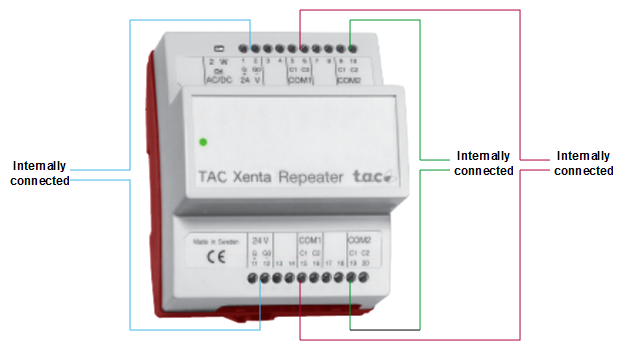
The Xenta Repeater features two sets of terminals labeled identically, which may cause confusion during installation.
Product Line
TAC Vista
Environment
Vista Lon Network
Cause
The duplicate power supply and communication terminals are internally connected. This design allows flexibility in wiring but can be misinterpreted.
Resolution
- Both the upper and lower terminals are electrically connected and can be used interchangeably for power and communication.
- These duplicate terminals are provided for convenience, allowing easier access depending on installation layout.
- Connect one Lon network segment to COM1 and the other to COM2.
- Supply the repeater with 24V power.
Wiring Examples
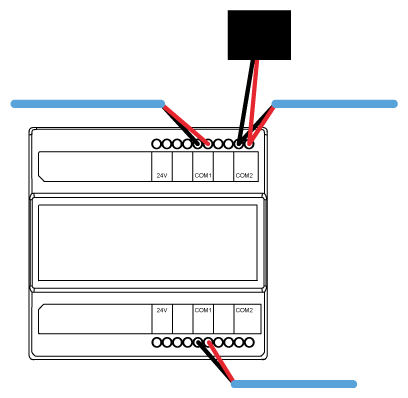
Example 1: Traditional Bus Topology
- Segment 1 enters via COM1 and ends at the repeater (terminated).
- Segment 2 exits via COM2, beginning a new segment (also terminated).

Example 2: Terminal Flexibility
- Same as Example 1, but demonstrates that either the upper or lower terminals can be used due to internal connectivity.

Example 3: Pass-Through Configuration
- Segment 1 enters and exits through COM1 (not terminated, as it's not end-of-line).
- Segment 2 begins at COM2 and is terminated at the repeater.
Additional Information
For a deeper understanding of the Xenta Repeater’s role in signal restoration and conditioning on LonWorks networks, refer to:
👉 The Xenta Repeater provides signal restoration and conditioning on LON networks
