Ask Me About Webinar: Data Center Assets - Modeling, Cooling, and CFD Simulation
Join our 30-minute expert session on July 10, 2025 (9:00 AM & 5:00 PM CET), to explore Digital Twins, cooling simulations, and IT infrastructure modeling. Learn how to boost resiliency and plan power capacity effectively. Register now to secure your spot!
How to install DCO-8.1 on a UEFI-based systems (physical or virtual).
EcoStruxure IT forum
Schneider Electric support forum about installation and configuration for DCIM including EcoStruxure IT Expert, IT Advisor, Data Center Expert, and NetBotz
- Mark Topic as New
- Mark Topic as Read
- Float this Topic for Current User
- Bookmark
- Subscribe
- Mute
- Printer Friendly Page
- Mark as New
- Bookmark
- Subscribe
- Mute
- Permalink
- Email to a Friend
- Report Inappropriate Content
Link copied. Please paste this link to share this article on your social media post.
Posted: 2020-07-03 03:59 PM . Last Modified: 2024-04-08 12:46 AM
How to install DCO-8.1 on a UEFI-based systems (physical or virtual).
Hi all!
In continuation of the topic considered in the , I want to offer a practically verified solution. I.e., how to successfully install the DCO-8.1 on UEFI-based systems (physical or virtual). Moreover, the topic appeared a little unexpectedly and it has the right to exist: it's no secret that many modern servers/systems already contain NVMe SSD storage with a huge performance of the disk subsystem. And as we all know, the OS booting from such storage is only possible with the support UEFI.
- Since DCO-8.1 is based on CentOS-7.3 (1611), you first need to download at least the Minimal bootable iso-image from the corresponding site in the Internet.
- Secondly, for simplicity, you need to copy all the contents above the specified iso-image to a USB-flash drive with FAT32 (not NTFS) file system. It can be very easy to do, and under MS Windows, for example, using 7-zip program. You could certainly burn the above image on a CD/DVD media (in my example I did, virtually 😀. But I assume, that the usual physical server either contains only one CD/DVD drive, or does not contain it at all. And if the server contains a CD/DVD drive, it will be occupied by the installation image of DCO-8.1.
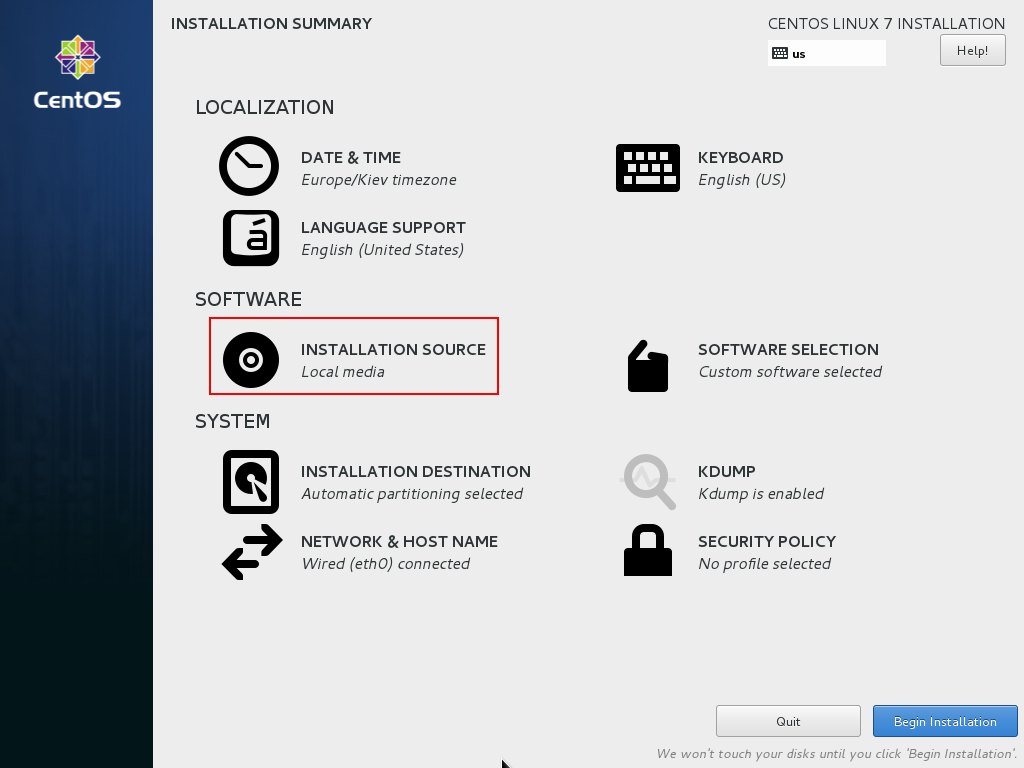
- Further, we assume that the DCO-8.1 installation image is already connected to our UEFI-based server and in addition we also inserted a USB-flash drive with files from the CentOS-7.3 image. After that, we boot from the DCO-8.1 installation image in the usual way. By answering some initial questions, go to the INSTALLATION SUMMARY screen of the installer where we enter the INSTALLATION SOURCE section:
- Next, you need to temporarily switch to the text console using the keys, for example, Ctrl+Alt+F2 and use the lsblk command to look at all the connected block devices (storages):
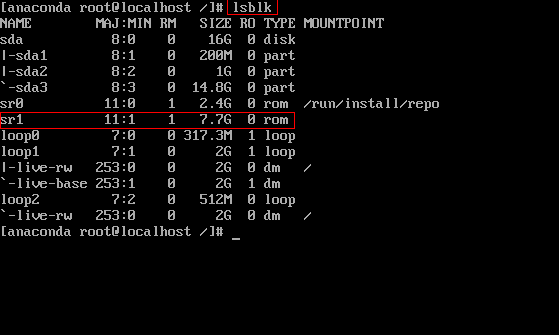
- The screenshot above clearly shows that the 2.4G CD/DVD drive sr0 is an installation image of DCO-8.1, and the 7.7G CD/DVD drive sr1 is a DVD media with an additional CentOS-7.3 image (I used Everything image in its example). Of course, if we use a USB-flash drive, the block device name will be different, for obvious reasons.
- Next, just create in root RAM file system, for example, the folder cdrom and mount it USB-flash drive with additional files. In my screenshot, I create and mount an additional CD/DVD drive in the above folder:
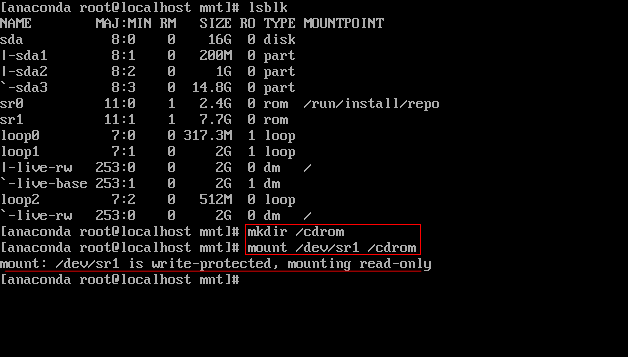
- If done correctly, the USB-flash drive will be successfully mounted. Next you need to switch back to the graphical installer console using Ctrl+Alt+F7 to the section INSTALLATION SOURCE.
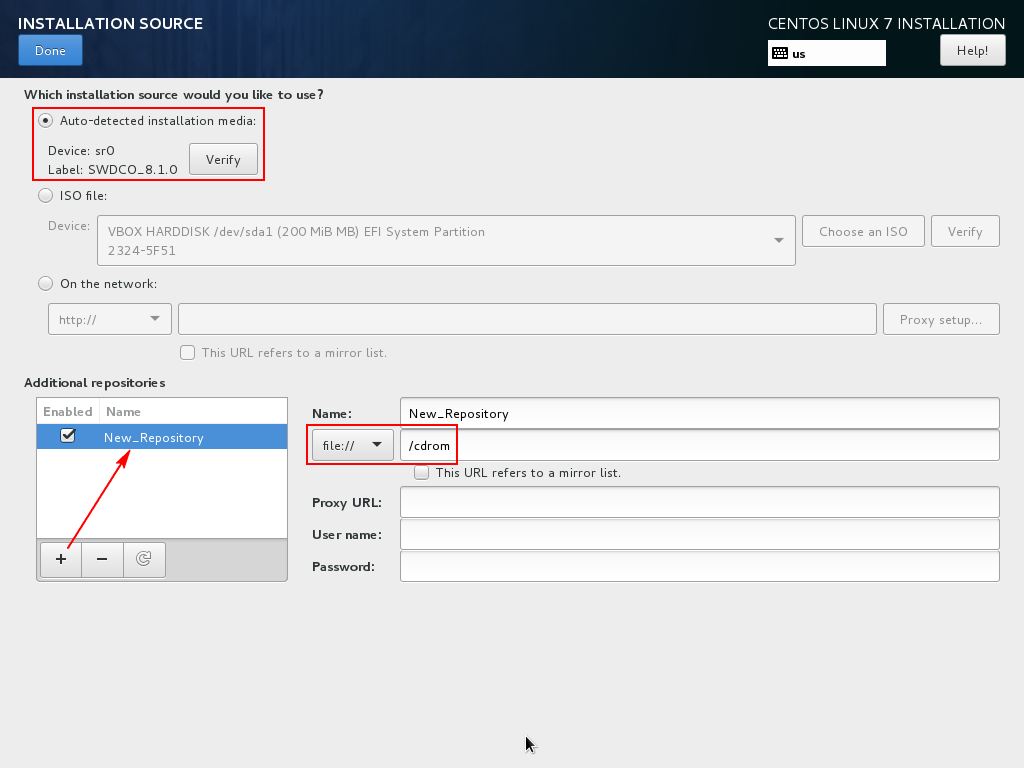
- In the INSTALLATION SOURCE we just add a new repository with the files from the installation image of CentOS-7.3. An example is shown in the screenshot, where the important points are highlighted in red. Moreover, the name of the folder with additional files does not matter: I have this cdrom (in the beginning should always be the symbol / and select the protocol file:// ). The main thing is that the folder name exactly coincides with what we created in the text console in the previous steps. When finished, press the Done button:
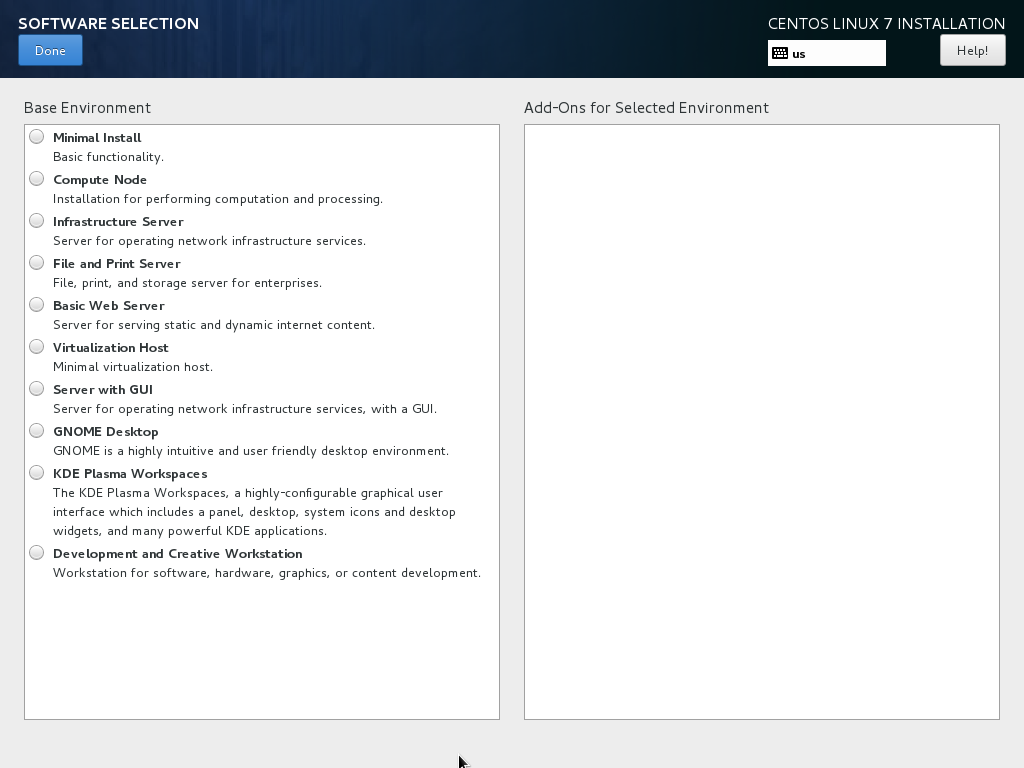
- In the SOFTWARE SELECTION section, you do not need to select anything, for example, as in the screenshot:
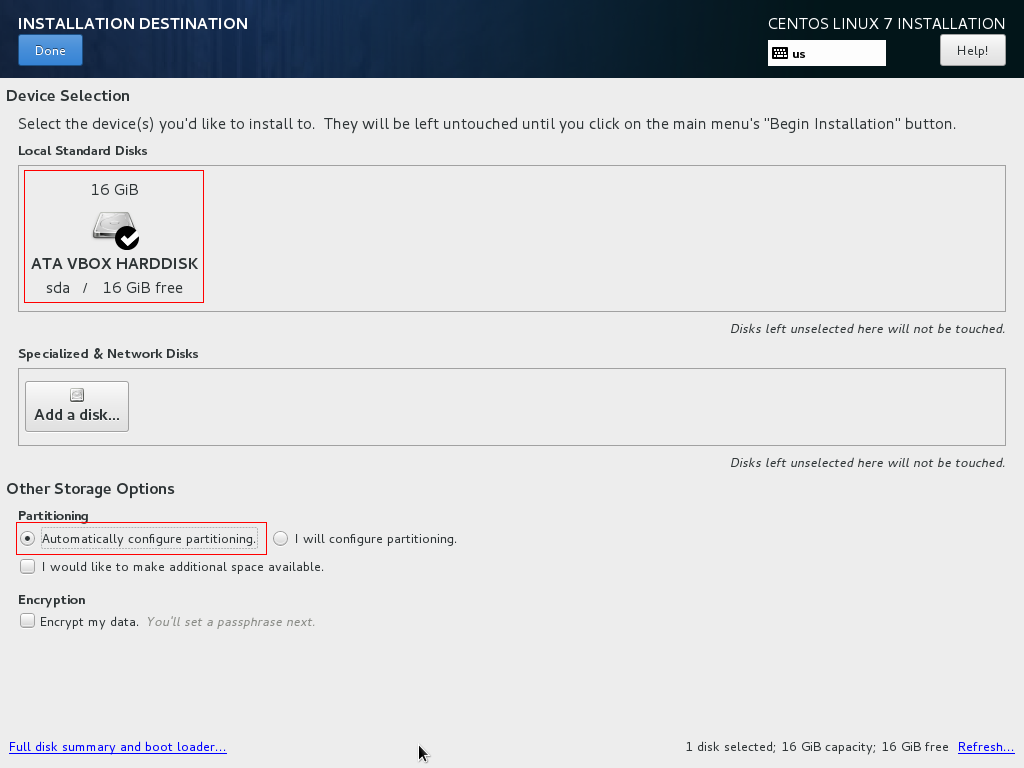
- In the INSTALLATION DESTINATION section I highlighted the important points in red in the screenshot. I.e., we select the target disk and automatically configure the partitions. And do not forget to press Done:
- If everything is done correctly, then after clicking Begin installation, the normal installation process of DCO-8.1 will begin, but on the UEFI-based system. That I did 😀.
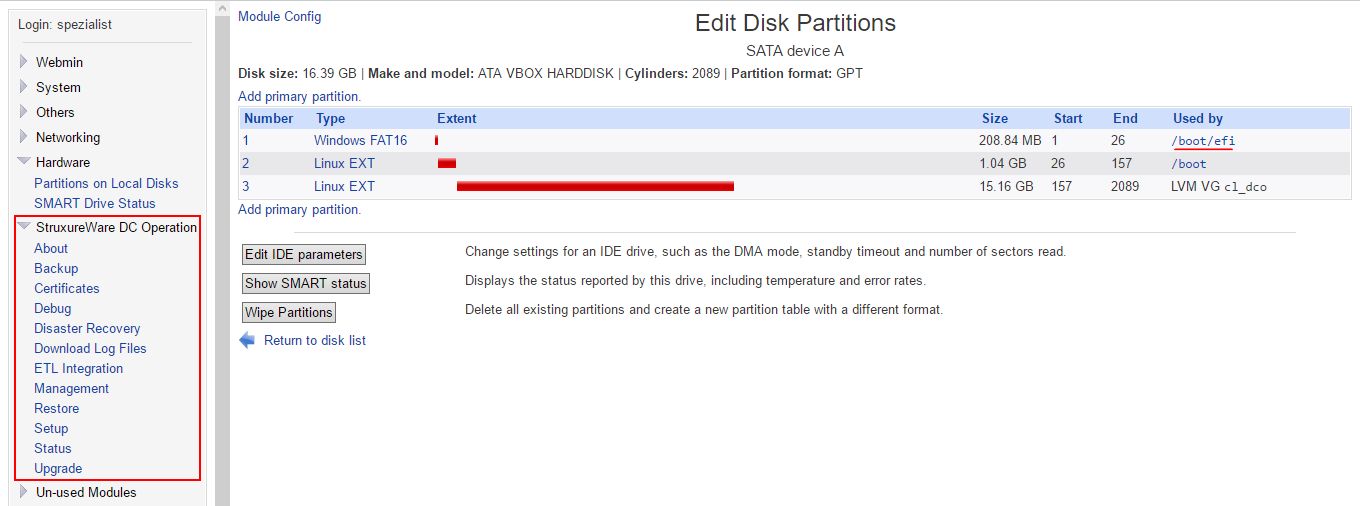
As a proof I'll show a couple of screenshots, for example, here is the partitions table of the DCO-server with UEFI-partition:
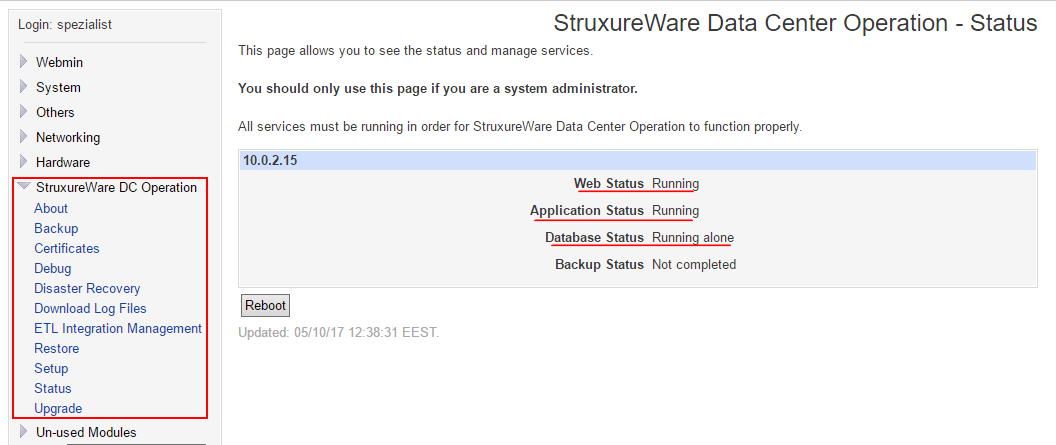
And this is a screenshot of the status of the DCO-server from the same webmin-console with the normal status Running:
I hope this will be useful and as usual, questions are welcome.
(CID:118003183)
- Labels:
-
Data Center Operation
- Tags:
- linux
Link copied. Please paste this link to share this article on your social media post.
- Mark as New
- Bookmark
- Subscribe
- Mute
- Permalink
- Email to a Friend
- Report Inappropriate Content
Link copied. Please paste this link to share this article on your social media post.
Posted: 2020-07-03 03:59 PM . Last Modified: 2024-04-08 12:46 AM
Thanks a lot spezialist. I will definitely try that in my next installation 😀. I believe it is just time matter before we are explicitly required to choose UEFI in our installation
(CID:118003285)
Link copied. Please paste this link to share this article on your social media post.
- Mark as New
- Bookmark
- Subscribe
- Mute
- Permalink
- Email to a Friend
- Report Inappropriate Content
Link copied. Please paste this link to share this article on your social media post.
Posted: 2020-07-03 03:59 PM . Last Modified: 2024-04-08 12:46 AM
Hi Winnie Chau,
As I answered in the previous topic , DCO-8.1 can be installed on any server/system, if only it was possible to switch to the legacy BIOS mode. And here I wanted to show the case where this is not possible, either because the server's firmware configuration, or due to the use as a storage fast NVMe SSD drives.
Still new UEFI mode used very often, and it is necessary to be considered.
With respect.
(CID:118003358)
Link copied. Please paste this link to share this article on your social media post.
- Mark as New
- Bookmark
- Subscribe
- Mute
- Permalink
- Email to a Friend
- Report Inappropriate Content
Link copied. Please paste this link to share this article on your social media post.
Posted: 2020-07-03 04:00 PM . Last Modified: 2023-10-22 02:31 AM

This question is closed for comments. You're welcome to start a new topic if you have further comments on this issue.
Link copied. Please paste this link to share this article on your social media post.
Create your free account or log in to subscribe to the board - and gain access to more than 10,000+ support articles along with insights from experts and peers.
Welcome!
Welcome to your new personalized space.
of
