
Issue
It is not clear how to replace an existing AS with a new AS-P
Product Line
EcoStruxure Building Operation
Environment
- Automation Server (AS)
- Automation Server Premium (AS-P)
- First detected in version 1.7
Cause
Detailed instructions on how to replace an existing AS with a new AS-P are needed
Resolution
WebHelp references
Automation Server Replacement Using Restore
Automation Server Replacement Using Restore Workflow
Overview
Main differences between an AS and an AS-P:
- In the AS-P, the RS-485 ports have been re-located to the top.
- The AS-P has 2 Ethernet ports; port 2 can be used as a switch only as of SBO version 1.81.
- AS-P device USB port format changed to mini USB.
- Operator Panel port has been removed.
- Hardware factory reset has been removed.
- AS-P uses pluggable connectors for field buses. (not shown in picture above)
- Consider the power consumption. AS-P requires 10 watts, while the Automation Server only required 7 watts.

Preparations
In preparation for replacing an Automation Server with an AS-P the following considerations must be made:
Power consumption
Since the AS-P consumes three more watts than the classic Automation Server, the power budget needs to be reviewed to check whether an additional power supply and/or rearrangement of the current configuration is needed, if the configuration includes IO modules.
Terminal base
The terminal base for the classic Automation Server can be used with the new AS-P after removal of the upper terminal block. Note though that all field buses wiring has to be moved to the pluggable connectors used with the AS-P.

RS-485 field bus re-wiring
Since the RS-485 ports and connectors have been relocated, the termination at the server of any field bus located on those ports will need re-wiring. Also, the physical specification of the RS-485 port is changed in the AS-P, so review whether the termination resistors needs to be replaced. Refer to Configuration Selection for Generic RS-485 Network Devices
AS-P firmware
Unlike the classic Automation Server, the AS-P ships from the factory with no firmware installed. Make sure to procure the appropriate Device Administrator firmware to install in the unit. First version that supports the AS-P is 1.7. Note once again that the USB port format in the AS-P is mini USB, so procure the appropriate USB cable.
Backup file
Make a backup of the classic AS to be replaced, the AS-P will restore from a classic AS backup but this is a one way process, the classic AS will not restore from an AS-P backup file. If the classic AS is running an older version of firmware, it will have to be upgraded first to at least 1.7.2.
Power budget review
Since the AS-P consumes 10 watts of power versus 7 watts for the classic Automation Server, it is necessary to review the power budget to ensure there is enough power for the AS-P, if the Automation Server being replaced is hosting IO modules.
One power supply (PS-24V) can supply 30W.
The following table shows power consumption for the different device types
| Device | Power |
|---|---|
| AS-P | 10 |
| AS | 7 |
| DO-FA-12-H | 1.8 |
| DO-FA-12 | 1.8 |
| DO-FC-8-H | 2.2 |
| DO-FC-8 | 2.2 |
| DI-16 | 1.6 |
| RTD-DI-16 | 1.6 |
| AC-4 | 11.1 |
| UI-16 | 1.8 |
| AC-2 | 5.5 |
| AO-8-H | 4.9 |
| AO-8 | 4.9 |
| AO-V-8-H | 0.7 |
| AO-V-8 | 0.7 |
| UI-8-AO-4 | 3.2 |
| UI-8-AO-4-H | 3.2 |
| UI-8-DO-FC-4 | 1.9 |
| UI-8-DO-FC-4-H | 1.9 |
| UI-8/AO-V-4 | 1.0 |
| UI-8/AO-V-4-H | 1.0 |
In case one or more additional power supplies are needed, refer to the example given in last part of this article.
Note:
The following "replacement procedure" applies to SBO 1.7.x, 1.8x, 1.9x, EBO 2.0x and 3.0.x and 3.1.x.
The AS-P must be running the same version as the original AS backup.
The AS was no longer supported from EBO 3.2.x.
If the site needs to take the AS-P to EBO 3.2 or later, the following should be followed at the AS supported version, then once the AS backup has been restored to the AS-P, the AS-P can be upgraded further, following the supported upgrade path, which can be found in the release notes for the specific EBO version.
Replacement procedure
The following procedure assumes the classic Automation Server is being replaced with a brand new AS-P from the factory
- If the Automation Server is hosting IO modules then perform the steps in the 'Power Budget' section below before going to the next step.
- Perform pre-maintenance procedure per site requirements, i.e. put equipment in hand control mode etc.
- Pull out the classic Automation Server from the terminal base. The hardware is designed for hot swapping so there is no need to power down the system.
- Remove the terminal block from the terminal base as indicated above.
- Insert the AS-P in the terminal base.
- Connect Device Administrator to AS-P via USB and install a new database on it. You may want to check the 'Set time on device' check box to initialize the time in the AS-P since its current time is most likely at default if this is a brand new unit or a unit that has been powered down for a while.
- Using Device Administrator set the communication parameters of the AS-P (IP address etc) to match the settings of the classic Automation Server being replaced. Connect Ethernet cable from network switch to Ethernet 1 port on the AS-P.
- If a hotfix was installed on the Automation Server that is replaced, apply any hotfix needed to match the version of the firmware in the AS-P to the version of the backup from the Automation Server. Since the AS-P should now be able to communicate over IP the application of any HF can be done either over USB or IP.
- Using WorkStation, log in directly into the AS-P and restore the backup from the classic AS.
- Insert pluggable connectors for field buses.
- If there is an Enterprise Server, log into Enterprise Server from WorkStation and verify the newly swapped AS-P is online.
- Verify IO modules (if any) are online.
- Verify field devices (if any) are online.
- Return the system to software control per site requirements.
- Verify the system is operating correctly then perform a backup of the AS-P.
Power supply addition example
Consider the following system
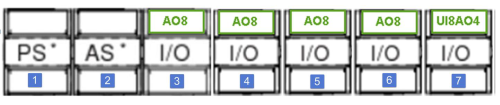
If we do the math, the power consumption of this system is 29.8 watts. To avoid exceeding the capacity of the existing PS we need to add an additional PS to the configuration before we replace the Automation Server with an AS-P. In order to maximize the use of the capacity of the first PS we will add a new PS at slot #7 and move the UI8AO4 IO module from slot #7 to slot #8.
Steps
- Disconnect the UI8AO4 IO module making sure it powers down. It is necessary that any IO modules being relocated on the IO bus are powered down so that they 'forget' their current module IDs. ***
- Logon to the Automation Server, make sure UI8A04 shows offline then edit the module and change its Module ID from 7 to 8.
- Insert power supply at slot #7
- Attach the UI8A04 after the new PS (slot #8), when it powers up it will obtain its new Module ID (8) from the Automation Server.
- Last, if the module’s name contains the ID (Slot07:UI8AO4) it may be a good idea to rename it using the new ID to avoid confusion. (Slot08:UI8AO4)
*** It is absolutely necessary that all the modules that will change IDs be powered down, if there are multiple power supplies in the chain make sure to power down all power supplies that are supplying power to any modules that will change slot #.
When removing or inserting IO modules or handling S-Cables, care should be taken not to bend or otherwise damage the pins that connect the module to its IO terminal base, any damage to the pins may cause the module address to shift.
Tip
There is a tool on the community (SBO xbk Analyzer) that can be used to automatically calculate the power budget from a backup of the AS/AS-P.
Here is the power budget report generated from the tool after addition of second power supply at slot #7 before replacing the classic AS with an AS-P. The total power consumption is 29.8 watts but we have increased the power capacity of the system to 60 watts with the addition of the second power supply.

The instructions above are available as a PDF: Replacing a classic AS with AS-P
