
Issue
PageGate allows for network paging or network wide SMS messaging from any combination of the following modules: web, email, commandline/ascii, serial, TAP-in and (GUI) windows workstations. SMS or text messages can be sent to alphanumeric pagers, numeric pagers, cell phones, PIMs, billboards or pcmcia pager cards.
For capturing and paging I/NET Seven alarms and messages the “Get Serial” module from PageGate is used.
Environment
- I/NET Seven
- PageGate
Cause
Network paging or network wide SMS messaging required.
Resolution
Click here to download this document as a PDF
Configuring I/NET to send a message
- Open up the IO Server.
- Choose your configuration profile. Maybe direct connect. Click Modify.
- Under Peripherals, change Text Output Port to a COM port that is not being used, COM3 for example. I/NET will most probably be using COM1. See screen cap below. Set Baud Rate to 9600.
- Click OK to close out the Configuration Profile Screen.
- Restart I/NET and I/O Server for changes to take affect.
- Open up Alarms, Messages, & Transactions. Go to the Edit drop down menu and select Text Library.
-
Here you will need to know the address for the point that you want to generate a message for when it goes into alarm. Choose add to enter point address and desired text message. As you can see above you can enter any text message you want.


I/NET is now configured to send a text message to PageGate.
Hardware Connections for PageGate-I/NET interface
- Three Com Ports are required to send the message from I/NET to PageGate Server. One for the I/NET port, a second for the Text Output Port so AMT can send the message, and the third COM port for PageGate to catch the message.
- Physically connect the Text Output Port to the PageGate COM port that will be catching the message.
See Illustration below.
Note: If you run out of COM ports you can go to Radio Shack and purchase a USB to serial cable. It comes with the software to create another COM port. Be aware that it is not plug in play. The software/PC will refer to that USB port as
your new COM port. In other words, if you take the USB plug out and insert it into another USB port you will have to repeat the installation to create another new COM port and it will have a different number then you will have to go back into I/NET or PageGate to point to the right COM port. I found this out because my customer decide he wanted to move his USB cables around and then PageGate quit working.

Configuring PageGate
PageGate consists of PageGate server, PageGate Admin, & PageGate Monitor. From now on I will refer to PageGate as PG. PG Server is an e-mail server and will create an e-mail domain such as inet@villadematel.com. PG Server can be ran as a Windows NT application so the customer does not have to worry about starting PG when he boots his machine up. PG Monitor will show I/NET generate the alarm, PG catches that alarm, and PG Server e-mails the message out. It is not necessary to run PG monitor unless you are setting up the software or trouble shooting a problem.
Follow these steps to assist you in setting up PG to send your message to a cell phone or pager.
- Go to http://www.notepage.net/ to download the trial version.
- Install the software and then open up PG Admin to begin configuration.
- The PG software file system is organized in a tree structure. Open up Settings under, Program, and PageGate. From this point on reference tree structure on screen caps to navigate through PG.
- Under settings choose Run PG as an application and check the box next to scheduler, GetSerial and Dialer 1. Remember to go back and change to NT service once you get customer set up.
- Set the capture serial port for PG, baud rate, parity, data bits, stop bits, handshaking, & init string as you see below. These are the settings that I/NET uses when it transmits a message out the Text Output Port.
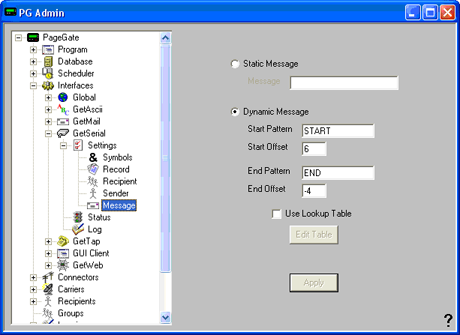
- Go to the GetSerial drop down to Record and enter the Start Pattern and End Pattern you see below. This tells PG how to determine what the message is.
- Under Recipient choose static recipient and give whatever name you want. The person or group that will be receiving the message.
- Now name your Static Sender. The application (In our case I/NET) that is sending the message.
Select Message and choose Dynamic Message since our text alarms from I/NET will be different most of the time. Put START offset at 6 so PG will know when our message starts and –4 so it will know when the message ends. 6 being the length of “START “ plus a space and –4 being a space plus the length of “END”.
We have now configured PG Get Serial to capture the I/NET message. - Connectors. PG will always require at least 1 dialer running and if you are sending a message on the internet you will need to set up the Global settings as well.
- Under SMTP create a Local Domain. When your customer receives a message it will be from “static.sender.name@localdomain.com”. For example Villa De Matel receives a text message from inet@villadematel.com. Then enter your customers DNS server addresses. You only need one but enter both if you have them. Obtain from their IT department or internet provider.
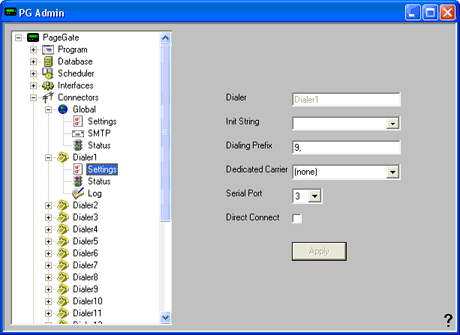
- Dialer set up. Even though we are not dialing with a modem PG uses a dialer to send all messages. Serial Port in this case is for an external dedicated modem. Just make sure you have Dialer 1 running (See step 4).
- Carrier creation. Here we create the cell phone/pager provider that our customer will be using to receive messages and pages. In my customers case it was T-Mobile. To do this, right click on carrier and select Add.
Select the drop down box under protocol and select SMTP or the appropriate protocol you need. TAP, GSM, SNPP, etc.
- Recipient creation. Here we enter the contact data for the individual’s cell phone, pager, fax number, e-mail address, etc. Fill in name of recipient and check the box for enabled service. It is possible to send messages to multiple devices such as an e-mail and text message at the same time. Just check the service you are using but remember you need a dialer for each service. Refer to cell phone provider for e-mail address format. For T-Mobile it was phone number@tmomail.net. Also check the box for Alpha and Drop non-printable characters.
- Group creation. You can create a Group and PG will send messages to every recipient in that group for the appropriate enabled service. Right click on group and select add. Check box to enable appropriate service.
- Select recipients you want to add and move them across into your new group. Select apply and PG will now send messages to all recipients in that group.


This write up is intended to be a general guide in setting up PageGate for your customer. Most likely your customer’s setting will differ from the settings in this write up.
To download the software here is the link to the website: http://www.notepage.net/
Once you get the trial software working you have about 10 days to pay for it because the trial version will shut the scheduler down every so often until you pay for the software. Good luck!
