Help
  • Explore Community
  • Get Started
  • Ask the Community
  • How-To & Best Practices
  • Contact Support
Notifications
Login / Register
Community
Community
Notifications
close
  • Forums
  • Knowledge Center
  • Events & Webinars
  • Ideas
  • Blogs
Help
Help
  • Explore Community
  • Get Started
  • Ask the Community
  • How-To & Best Practices
  • Contact Support
Login / Register
Sustainability
Sustainability

We Value Your Feedback!
Could you please spare a few minutes to share your thoughts on Cloud Connected vs On-Premise Services. Your feedback can help us shape the future of services.
Learn more about the survey or Click here to Launch the survey
Schneider Electric Services Innovation Team!

How to reconfigure the IP address of a L-IP?

Building Automation Knowledge Base

Schneider Electric Building Automation Knowledge Base is a self-service resource to answer all your questions about EcoStruxure Building suite, Andover Continuum, Satchwell, TAC…

cancel
Turn on suggestions
Auto-suggest helps you quickly narrow down your search results by suggesting possible matches as you type.
Showing results for 
Show  only  | Search instead for 
Did you mean: 
  • Home
  • Schneider Electric Community
  • Knowledge Center
  • Building Automation Knowledge Base
  • How to reconfigure the IP address of a L-IP?
Options
  • Bookmark
  • Subscribe
  • Email to a Friend
  • Printer Friendly Page
  • Report Inappropriate Content
Invite a Co-worker
Send a co-worker an invite to the portal.Just enter their email address and we'll connect them to register. After joining, they will belong to the same company.
You have entered an invalid email address. Please re-enter the email address.
This co-worker has already been invited to the Exchange portal. Please invite another co-worker.
Please enter email address
Send Invite Cancel
Invitation Sent
Your invitation was sent.Thanks for sharing Exchange with your co-worker.
Send New Invite Close

Related Forums

  • Intelligent Devices Forum

Previous Next
Contributors
  • DavidFisher
    DavidFisher
  • Zhenting_HU
    Zhenting_HU
  • Product_Support
    Product_Support

Invite a Colleague

Found this content useful? Share it with a Colleague!

Invite a Colleague Invite
Back to Building Automation Knowledge Base
Options
  • Bookmark
  • Subscribe
  • Email to a Friend
  • Printer Friendly Page
  • Report Inappropriate Content
0 Likes
1542 Views

Link copied. Please paste this link to share this article on your social media post.

Trying to translate this page to your language?
Select your language from the translate dropdown in the upper right. arrow
Translate to: English
  • (Français) French
  • (Deutsche) German
  • (Italiano) Italian
  • (Português) Portuguese
  • (Русский) Russian
  • (Español) Spanish

How to reconfigure the IP address of a L-IP?

Picard Product_Support
‎2018-09-10 11:04 PM

Issue

How to reconfigure the IP address of a L-IP if not knowing its IP address?

Environment

  • LNS Turbo
  • Lonmaker turbo
  • Lonworks Network Interfaces
  • Loytec L-IP

Cause

In order to use a L-IP, its IP address need to be known for configuration, otherwise this L-IP cannot functioning at all.

Resolution

Please follow the steps below to retrieve a L-IP’s IP address.

1. At first prepare a RS232 serial cable of which two sides are 9-pin female connector, or one side is 9-pin female connector and another side is 9-pin male connector. Then one side of the RS232 cable connects to the L-IP’s Serial port (See the red ring of the Figure 1) and another side connects to the PC Serial port (if PC is no Serial Port, the MOXA RS232 USB-to-Serial Adaptor can also be used).

L-IP and Computer

                                                        Figure 1:L-IP and PC Connection


2. Use a PC Hyperterminal with the communication settings set to 38,400 bps / 8 data bits / no parity / 1 stop bit / no handshake. On the L-IP use a serial cable (1:1 male-female or female-female cable) to connect COM port (like comm1) on the PC to the Console on the L-IP. Power up the L-IP or press Return if the L-IP is already running. The following menu (See the Figure 2) should appear on the HyperTerminal:

L-IP-1

                                                                                                                                   Figure 2:Main L-IP menu

3. Select 5 and press Enter, then the following menu (See the Figure 3) would appear on the HyperTerminal. The current IP Address, IP Netmask and IP Gateway of L-IP would be displayed in this menu.

 L-IP-2

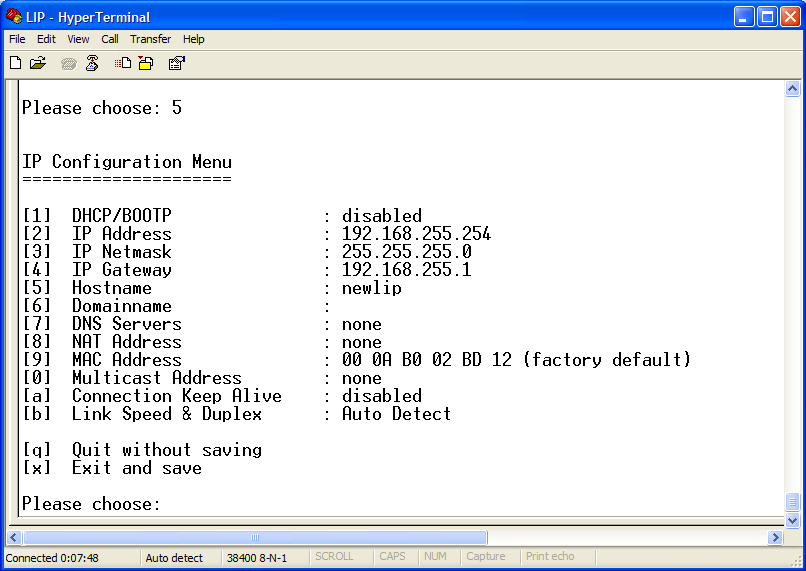
Figure 3: IP Configuration Menu

4. If modifying the IP address, select 2 and press Enter, type in the new IP address behind Enter new IP address and press Enter button (See the Figure 4).

L-IP-3

Figure 4: Enter new IP address

5. If modifying the IP Netmask, select 3 and press Enter, then type in the new IP Netmask.

6. If modifying the IP Gateway, select 4 and press Enter, then type in the new IP Gateway.

7. After finishing all modifications, select X and press Enter, then save your modifications and return to the main L-IP menu.

Please refer to the L-IP user manual for more detailed information.

Labels (2)
Labels:
  • Field Devices
  • TAC Vista
Tags (2)
  • Find more articles tagged with:
  • 11789
  • PeterLarsen23
Was this article helpful? Yes No
No ratings

Link copied. Please paste this link to share this article on your social media post.

To The Top!

Forums

  • APC UPS Data Center Backup Solutions
  • EcoStruxure IT
  • EcoStruxure Geo SCADA Expert
  • Metering & Power Quality
  • Schneider Electric Wiser

Knowledge Center

Events & webinars

Ideas

Blogs

Get Started

  • Ask the Community
  • Community Guidelines
  • Community User Guide
  • How-To & Best Practice
  • Experts Leaderboard
  • Contact Support
Brand-Logo
Subscribing is a smart move!
You can subscribe to this board after you log in or create your free account.
Forum-Icon

Create your free account or log in to subscribe to the board - and gain access to more than 10,000+ support articles along with insights from experts and peers.

Register today for FREE

Register Now

Already have an account? Login

Terms & Conditions Privacy Notice Change your Cookie Settings © 2025 Schneider Electric

This is a heading

With achievable small steps, users progress and continually feel satisfaction in task accomplishment.

Usetiful Onboarding Checklist remembers the progress of every user, allowing them to take bite-sized journeys and continue where they left.

of