Help
  • Explore Community
  • Get Started
  • Ask the Community
  • How-To & Best Practices
  • Contact Support
Notifications
Login / Register
Community
Community
Notifications
close
  • Forums
  • Knowledge Center
  • Events & Webinars
  • Ideas
  • Blogs
Help
Help
  • Explore Community
  • Get Started
  • Ask the Community
  • How-To & Best Practices
  • Contact Support
Login / Register
Sustainability
Sustainability

We Value Your Feedback!
Could you please spare a few minutes to share your thoughts on Cloud Connected vs On-Premise Services. Your feedback can help us shape the future of services.
Learn more about the survey or Click here to Launch the survey
Schneider Electric Services Innovation Team!

How to Configure NIC709-IP in order to be used in TAC Vista Classic Network

Building Automation Knowledge Base

Schneider Electric Building Automation Knowledge Base is a self-service resource to answer all your questions about EcoStruxure Building suite, Andover Continuum, Satchwell, TAC…

cancel
Turn on suggestions
Auto-suggest helps you quickly narrow down your search results by suggesting possible matches as you type.
Showing results for 
Show  only  | Search instead for 
Did you mean: 
  • Home
  • Schneider Electric Community
  • Knowledge Center
  • Building Automation Knowledge Base
  • How to Configure NIC709-IP in order to be used in TAC Vista Classic Network
Options
  • Bookmark
  • Subscribe
  • Email to a Friend
  • Printer Friendly Page
  • Report Inappropriate Content
Invite a Co-worker
Send a co-worker an invite to the portal.Just enter their email address and we'll connect them to register. After joining, they will belong to the same company.
You have entered an invalid email address. Please re-enter the email address.
This co-worker has already been invited to the Exchange portal. Please invite another co-worker.
Please enter email address
Send Invite Cancel
Invitation Sent
Your invitation was sent.Thanks for sharing Exchange with your co-worker.
Send New Invite Close

Related Forums

  • Intelligent Devices Forum

Previous Next
Contributors
  • Product_Support
    Product_Support
  • DavidFisher
    DavidFisher
  • Anonymous user

Invite a Colleague

Found this content useful? Share it with a Colleague!

Invite a Colleague Invite
Back to Building Automation Knowledge Base
Options
  • Bookmark
  • Subscribe
  • Email to a Friend
  • Printer Friendly Page
  • Report Inappropriate Content
0 Likes
1440 Views

Link copied. Please paste this link to share this article on your social media post.

Trying to translate this page to your language?
Select your language from the translate dropdown in the upper right. arrow
Translate to: English
  • (Français) French
  • (Deutsche) German
  • (Italiano) Italian
  • (Português) Portuguese
  • (Русский) Russian
  • (Español) Spanish

How to Configure NIC709-IP in order to be used in TAC Vista Classic Network

Picard Product_Support
‎2018-09-06 02:48 PM

Issue

  • What is NIC709-IP's IP address
  • How to use a NIC709-IP in TAC Vista Classic network

Environment

  • Tested with Windows XP SP3, Windows 7 computers.
  • LConfig version is 4.2

Cause

NIC709-IP looks similar to L-IP, however its configuration is totally different. The NIC709-IP's configuration is similar to NIC709-USB which requires the LConfig software.

Resolution

Scenario 1

If NIC709-IP address is know. Can change its IP address on its Webpage.

  1. Open the NIC709-IP webpage.
  2. Select the Config tab in the left menu bar.
  3. Select Port Config tab under the Config tab.
  4. In the main panel, choose the admin account, and type the password: loytec4u. Then click Login.
  5. Select the Ethernet tab on the top. Will need to enter the password again.
  6. In the IP Address field, type the desired the IP address. In this example, type 169.254.8.100. Then, click Save Settings.


Scenario 2

For brand new NIC709-IP, its IP address is 0.0.0.0. Please follow the steps below to set the IP address:

  1. Change the computer IP address to 169.254.8.X. X is any number between 1-255. In this case, the computer IP address to 169.254.8.1, and the subnet mask is 255.255.0.0.

     
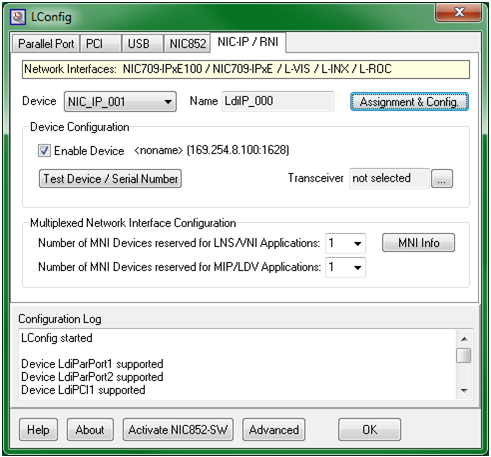
  2. Go to Start->All Programs->LOYTEC Network Interface->Lconfig.  Then Select NIC-IP/RNI tab.
    If the software is not listed, please go to LOYTEC website and download the most recent release version of Network Interface.
     
     
  3. Check the Enable Device checkbox.
  4. Click on the Assignment & Config button.
  5. Device should be automatically found. If not click on the Restart Search button.

     
  6. Select the device, then  click the Assign/Add button.
  7. Make the change to the IP address under IP/NAT  Address or DNS Name field if necessary. Then click on Assign Button.

     
  8. Click OK button. Note, the IP address should be changed from 0.0.0.0 to the address just assigned. In this case, the IP address has been changed to 169.254.8.100.

     
  9. Click the Test Device/Serial Number button to the connection. The pop-up window as shown below should be displayed.

     
  10. The NIC709-IP device should be configured at this point. For testing, can type the NIC709-IP address in the browser. 
Labels (1)
Labels:
  • TAC Vista
Tags (1)
  • Find more articles tagged with:
  • 11808
Was this article helpful? Yes No
No ratings

Link copied. Please paste this link to share this article on your social media post.

To The Top!

Forums

  • APC UPS Data Center Backup Solutions
  • EcoStruxure IT
  • EcoStruxure Geo SCADA Expert
  • Metering & Power Quality
  • Schneider Electric Wiser

Knowledge Center

Events & webinars

Ideas

Blogs

Get Started

  • Ask the Community
  • Community Guidelines
  • Community User Guide
  • How-To & Best Practice
  • Experts Leaderboard
  • Contact Support
Brand-Logo
Subscribing is a smart move!
You can subscribe to this board after you log in or create your free account.
Forum-Icon

Create your free account or log in to subscribe to the board - and gain access to more than 10,000+ support articles along with insights from experts and peers.

Register today for FREE

Register Now

Already have an account? Login

Terms & Conditions Privacy Notice Change your Cookie Settings © 2025 Schneider Electric

This is a heading

With achievable small steps, users progress and continually feel satisfaction in task accomplishment.

Usetiful Onboarding Checklist remembers the progress of every user, allowing them to take bite-sized journeys and continue where they left.

of